Build a realtime chat app with NodeJS, ReactJS, and ChatEngine.io
Here, we are going to build a full-stack, realtime chat app with Node JS, React JS and ChatEngine.io.
This feature rich application will have: User authentication, socket connections, real-time messaging, image and file attachments, group chats and DMs, read receipts… and more!
For our backend, we’ll use NodeJS and express. We’ll also store all our chat data on ChatEngine.io which has APIs and Socket channels for hosting chats.
For our frontend, we’ll be using ReactJS with some pre-built Chat UI components. Chat Engine’s NPM components are free building blocks for Chat UIs.
We’ll be building an app like in the demo above. With that in mind, let’s get started!
Step 1. Setting up a NodeJS server
First, let’s create a new project for our backend/ and frontend/. Then we’ll start with setting up our Node JS backend inside.
mkdir nodejs-reactjs-chat
cd nodejs-reactjs-chat
mkdir backend
cd backend
Not initate a new NodeJS project.
npm init # Hit enter for every stepOnce complete, you’ll have the following package.json file.
{
  "name": "backend",
  "version": "1.0.0",
  "description": "",
  "main": "index.js",
  "scripts": {
    "test": "echo \"Error: no test specified\" && exit 1"
  },
  "author": "Adam La Morre",
  "license": "ISC"
}
To run a proper Node server which we can connect to, we’ll need to install a few dependencies. So run the following command
# Withing the backend/ directory
npm i express cors axios
npm i --save-dev nodemonexpressis the HTTP server framework we’ll be usingcorsallows us to process requests from other hosts (for our ReactJS app)axiosallows us to send HTTP requests to other servers (for Chat Engine APIs)nodemonallows us to run the server in dev-mdoe
Make sure we all the following script in package.json. This way we can actually start the Node JS server.
{
    ...
    "scripts": {
        "start": "nodemon index.js"
    },
    ...
}
Last step, create an index.js file next to package.json with the following boiler-plate code.
const express = require("express");
const cors = require("cors");

const app = express();
app.use(express.json());
app.use(cors({ origin: true }));

app.post("/authenticate", async (req, res) => {
  const { username } = req.body;
  return res.json({ username: username, secret: "sha256..." });
});

app.listen(3001);
And start this server by running: npm run start
This basic server will run on port 3001, accepts calls from any origin, and has one API endpoint for /authenticate.
This endpoint takes a username from the request body, and retuns a fake User object.
Clearly we’ll need to add real user authentication code. In the next section, we’ll do that by using Chat Engine’s APIs.
Step 2. Connecting Node JS to ChatEngine.io
ChatEngine.io provides full-stack chat tools - which makes adding chat into Node apps easy.
To leverage this tool, we’ll create a Chat Engine project, and store our users in this project. All users in our Chat Engine project can chat with one another through their APIs / platform.
Let’s create a Chat Engine project for our users and connect our Node JS server to it!
Go to ChatEngine.io, sign up, and create your first project. Once this is done, you’ll see a Project ID and a Private Key.
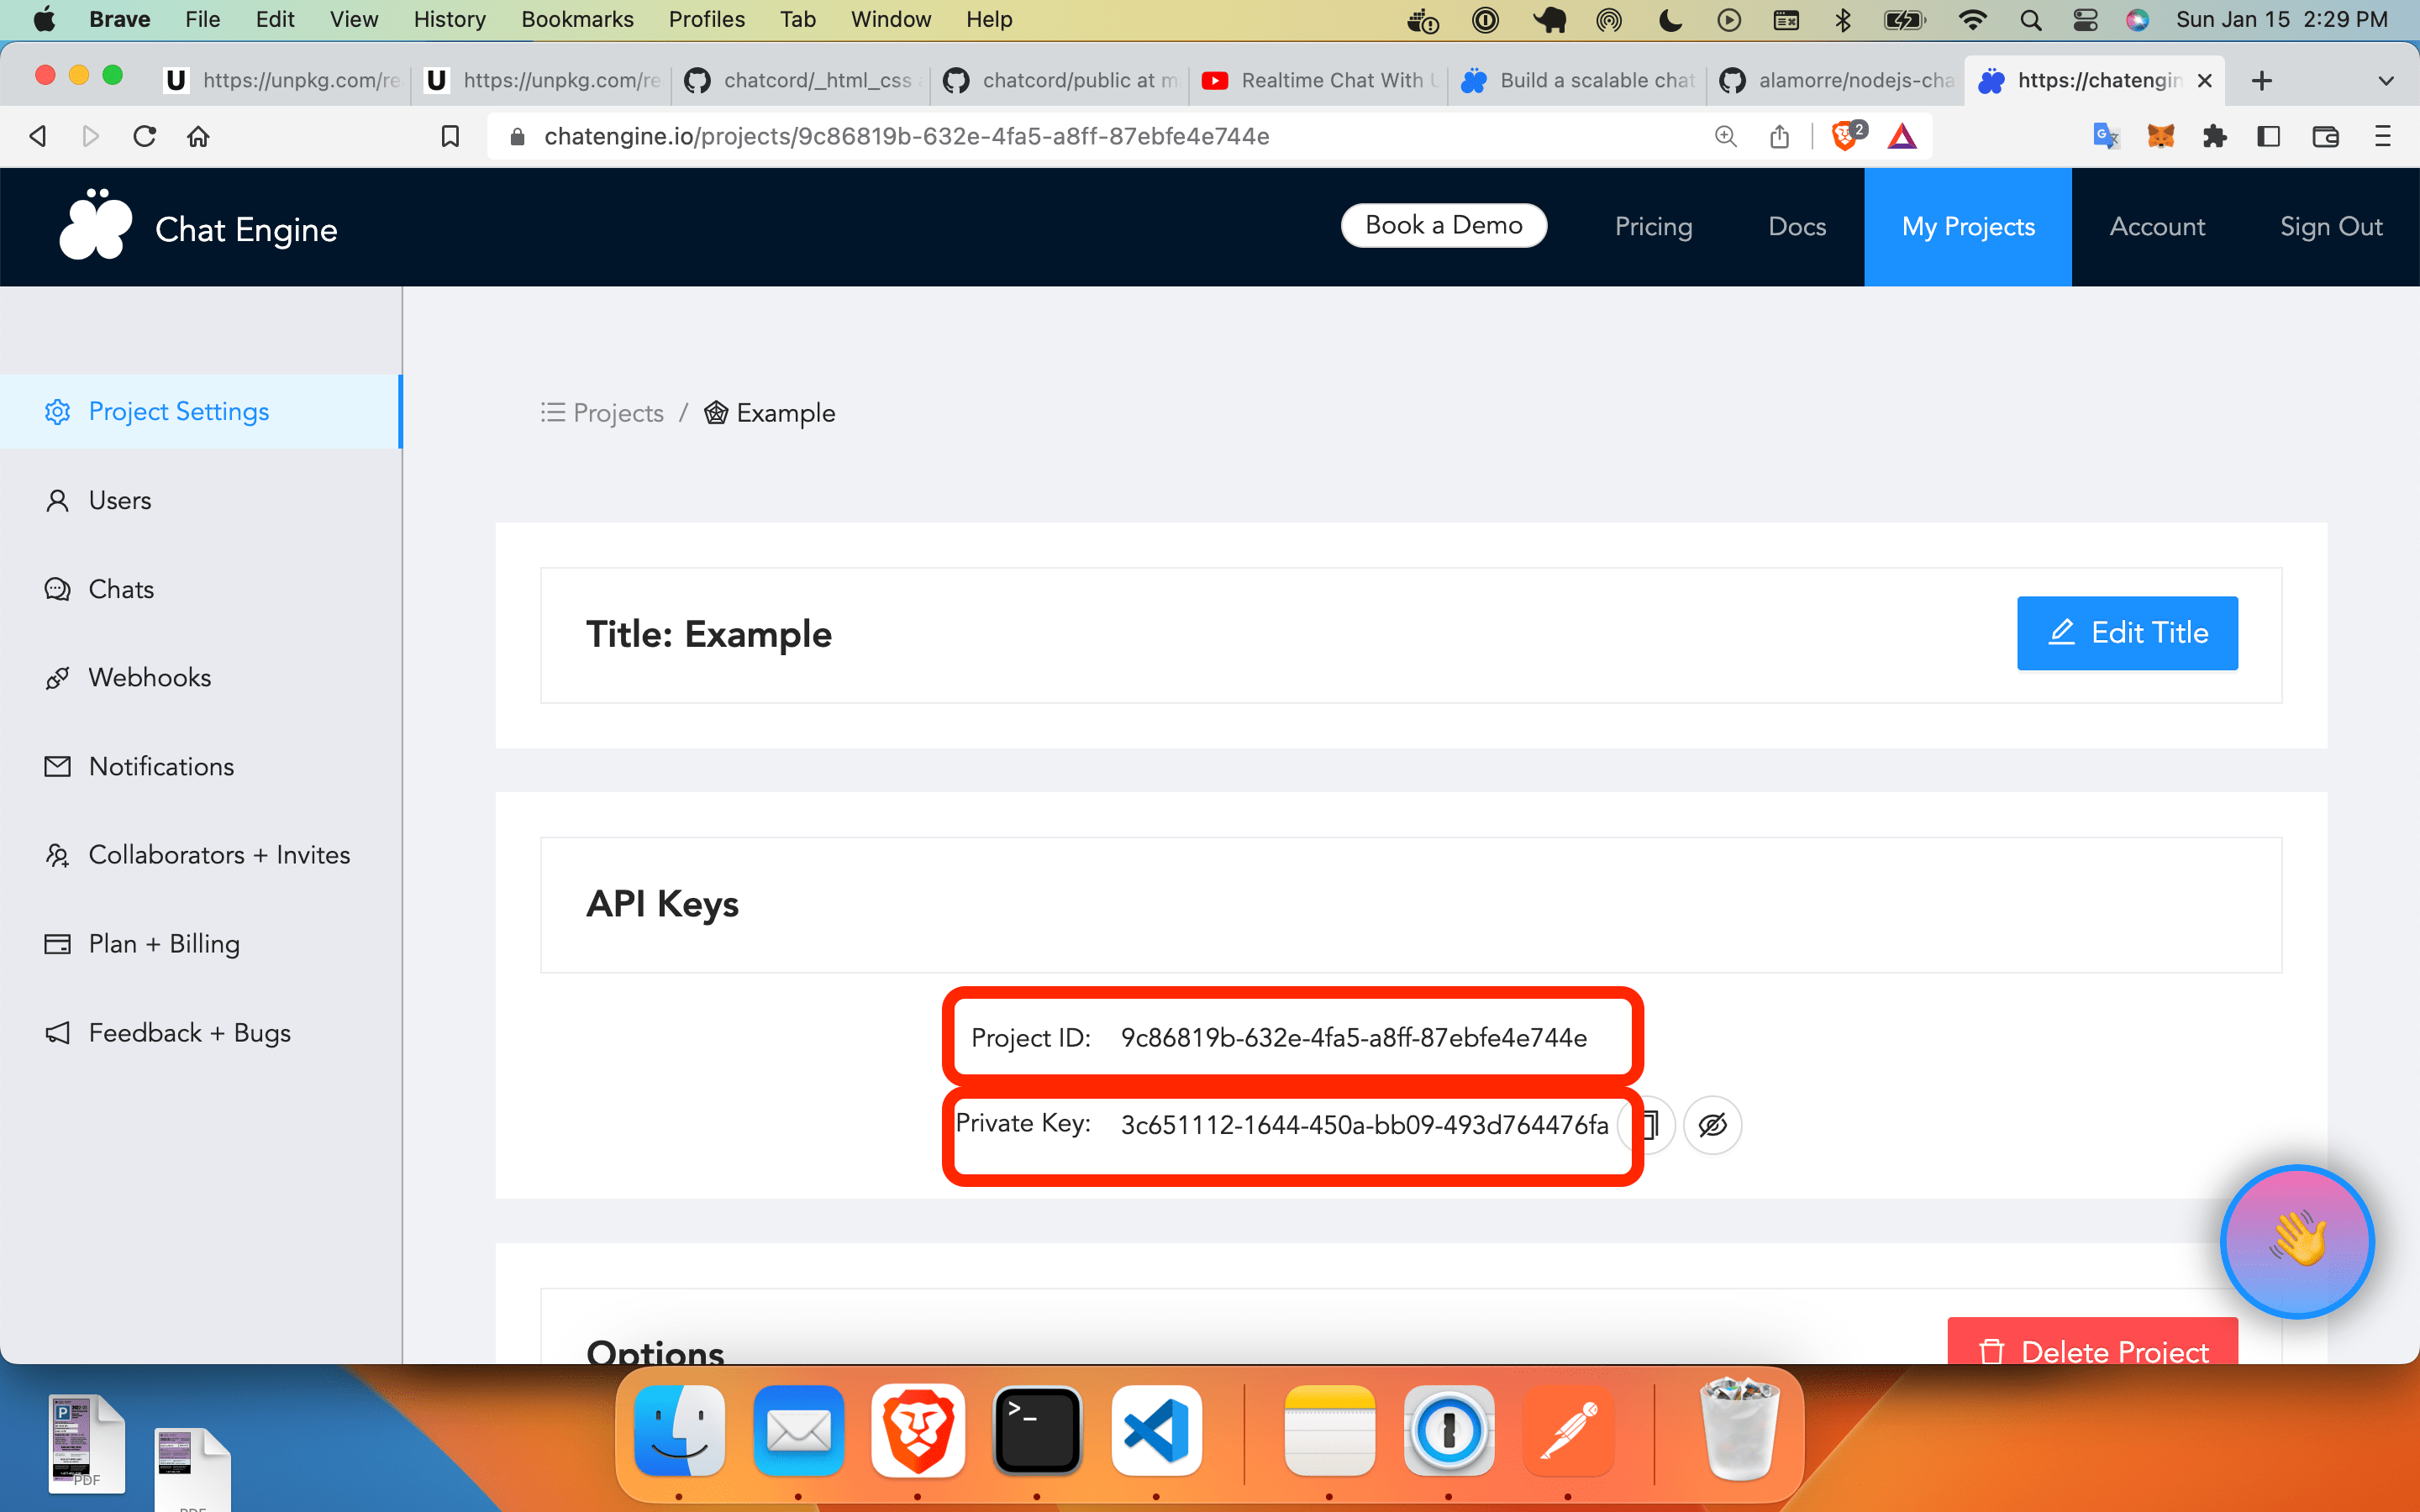
- The
Project IDis an API key which connects your API calls to your project - The
Private Keygives you permission to create and destroy users on your project
Copy them both because we’ll need them now.
Back in our index.js file, we’ll use this Get or Create User API call. It takes a username / password and sees if a user exists in this project with those credentials (and fetches their data). If that user does not exist, it will create that user and return their data.
(Docs on all Chat Engine APIs are at rest.chatengine.io)
Add the following code to the /authenticate function in index.js:
const axios = require("axios");

app.post("/authenticate", async (req, res) => {
  const { username } = req.body;
  // Get or create user on Chat Engine!
  try {
    const r = await axios.put(
      "https://api.chatengine.io/users/",
      { username: username, secret: username, first_name: username },
      { headers: { "Private-Key": "XXXX" } }
    );
    return res.status(r.status).json(r.data);
  } catch (e) {
    return res.status(e.response.status).json(e.response.data);
  }
});
Here, we import axios to make an API call the Chat Engine. We use the “Get or Create User” call to fetch or create this user - depending on if they already exists.
Be sure to replace "XXXX" with your Private Key so we can create users on your project.
Now this endpoint will register / authenticate users into our Chat Engine project.
To let users in our project can actually chat with one another, let’s add a chat UI + funtionality to our frontend in React!
Step 3. Set up a React JS frontend
Back at the top-level of our project, we’ll use Vite to stand up a React JS project. Run the following command:
npm create vite@latest
✔ Project name: … frontend
✔ Select a framework: › React
✔ Select a variant: › JavaScript
Now your nodejs-reactjs-chat should have the following structure:
.
├── backend
└── frontend
First, open the frontend/src/main.jsx file to remove the index.css file and take React off StrictMode. Your main.jsx file should look like this now:
import React from "react";
import ReactDOM from "react-dom/client";
import App from "./App";

ReactDOM.createRoot(document.getElementById("root")).render(<App />);
You can now remove the frontend/src/index.css file from your project.
Next, you can change frontend/src/App.jsx to the following code:
import { useState } from "react";

import "./App.css";

import AuthPage from "./AuthPage";
import ChatsPage from "./ChatsPage";

function App() {
  const [user, setUser] = useState(undefined);

  if (!user) {
    return <AuthPage onAuth={(user) => setUser(user)} />;
  } else {
    return <ChatsPage user={user} />;
  }
}

export default App;
This new App.jsx file will render the Authentication Page until a user logs in or signs up. Then, the onAuth() callback will set the user state, and render the Chats Page (and pass the user state in as a prop).
Create a frontend/src/AuthPage.jsx file and add the following code:
const AuthPage = (props) => {
const onSubmit = (e) => {
e.preventDefault();
const { value } = e.target[0];
props.onAuth({ username: value, secret: value });
};
return (
<div className="background">
<form onSubmit={onSubmit} className="form-card">
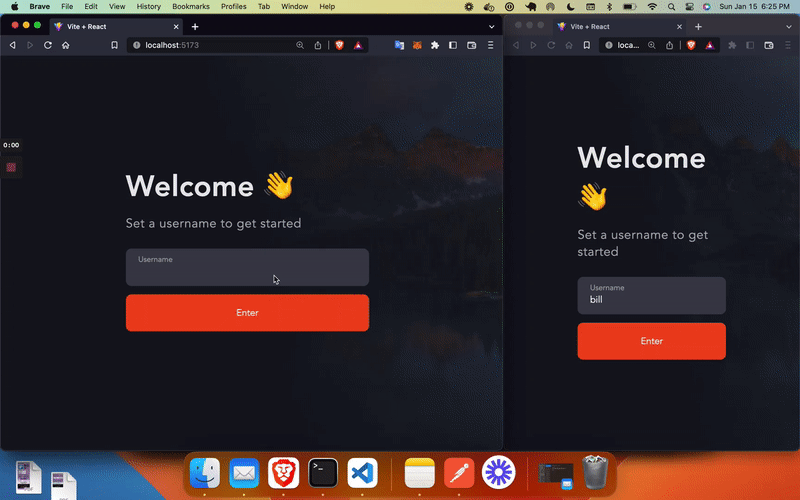
<div className="form-title">Welcome 👋</div>
<div className="form-subtitle">Set a username to get started</div>
<div className="auth">
<div className="auth-label">Username</div>
<input className="auth-input" name="username" />
<button className="auth-button" type="submit">
Enter
</button>
</div>
</form>
</div>
);
};
export default AuthPage;This Auth Page is just a form with one input for a username. In the next section we’ll connect this form to our Node JS server with API calls.
Finally, for our Chats Page, just set the frontend/src/ChatsPage.jsx file to an empty component for now:
const ChatsPage = () => {
  return <div className="background">chats...</div>;
};
export default ChatsPage;
‼️ You can also copy/paste the following CSS code to frontend/src/App.css if you wish ‼️
Run the React JS app with these commands:
npm install # install all dependencies first
npm run dev
Once done, you will have the following Chat App:
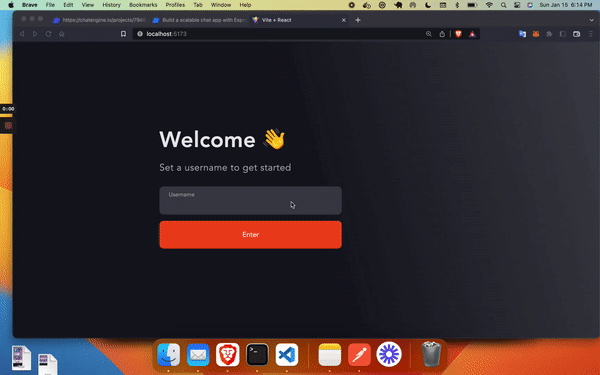
This app takes a user’s username for authentication and brings them to the Chat Page. But there are two things we have to do:
- Connect with Auth Page form to our
/authenticateendpoint on Node JS - Render a Chats Page chat UI and connect it to Chat Engine
Then we’re fully done.
Part 4. Connect React to Node JS and Chat Engine
First, let’s connect the auth form to our Node JS server so we can Get or Create users from our Chat Engine project.
Within frontend/ install the axios dependency with the following command:
npm install axiosWithin frontend/src/AuthPage.jsx add the code below.
This new code will call the NodeJS server at http://localhost:3001/authenticate upon onSubmit(), and send the required username in a request body. This should login and signup new users.
import axios from "axios";

const AuthPage = (props) => {
  const onSubmit = (e) => {
    e.preventDefault();
    const { value } = e.target[0];
    axios
      .post("http://localhost:3001/authenticate", { username: value })
      .then((r) => props.onAuth({ ...r.data, secret: value }))
      .catch((e) => console.log("Auth Error", e));
  };

  return (
    <div className="background">
      <form onSubmit={onSubmit} className="form-card">
        <div className="form-title">Welcome 👋</div>

        <div className="form-subtitle">Set a username to get started</div>

        <div className="auth">
          <div className="auth-label">Username</div>
          <input className="auth-input" name="username" />
          <button className="auth-button" type="submit">
            Enter
          </button>
        </div>
      </form>
    </div>
  );
};

export default AuthPage;
Last, to connect our Chats Page to Chat Engine, we can use one of their prebuilt UIs.
- react-chat-engine-pretty is an easy to use, midnight UI
- react-chat-engine look more like Facebook Messenger
- react-chat-engine-advanced is the most customizable
Today, I’ll be using react-chat-engine-pretty.
Within frontend install this component with the following command:
npm install react-chat-engine-prettyAdd the following code to frontend/src/ChatsPage.jsx to connect your React App to your chat engine project:
import { PrettyChatWindow } from "react-chat-engine-pretty";

const ChatsPage = (props) => {
  return (
    <div className="background">
      <PrettyChatWindow
        projectId={import.meta.env.VITE_CHAT_ENGINE_PROJECT_ID}
        username={props.user.username}
        secret={props.user.secret}
      />
    </div>
  );
};

export default ChatsPage;
Finally, add VITE_CHAT_ENGINE_PROJECT_ID to frontend/.env.local and use your own Project ID:
VITE_CHAT_ENGINE_PROJECT_ID=XXXConclusion!
You’re done 🎉 You should have the App which you see in the demo up top!
In summary, we stood up a Node JS server which accepts all CORS requests. We added an /authenticate endpoint which Gets or Creates users on Chat Engine.
We stood up a Chat Engine project which let’s our users talk with one another through their APIs / platform.
Finally, we connected our React App to our /authenticate API and connected a Chat UI to our Chat Engine project!
With these steps done, we have a full-stack chat app using Node JS, React JS and ChatEngine.io
I hope you enjoyed!