Build scalable chat with ExpressJS, ReactJS, and ChatEngine.io
Welcome to this tutorial on building a scalable full-stack chat application! In this tutorial, we will be using a combination of three powerful tools: ExpressJS, ReactJS, and ChatEngine.io.
- ExpressJS is a lightweight web framework for Node.js that makes it easy to build web applications and APIs.
- ReactJS is a popular JavaScript library for building user interfaces, with a focus on reusable components and declarative programming.
- ChatEngine.io is a real-time messaging platform that allows you to easily add chat functionality to your applications.
Together, these three tools will enable us to build a robust and scalable chat application that can handle thousands of concurrent users.
We will build this app using the following steps:
- Set up a basic ExpressJS server
- Integrate ReactJS for the frontend
- Use ChatEngine.io to add real-time messaging functionality to our application
By the end of this tutorial, you will have a fully functional chat application that you can customize and expand upon to meet your own needs.
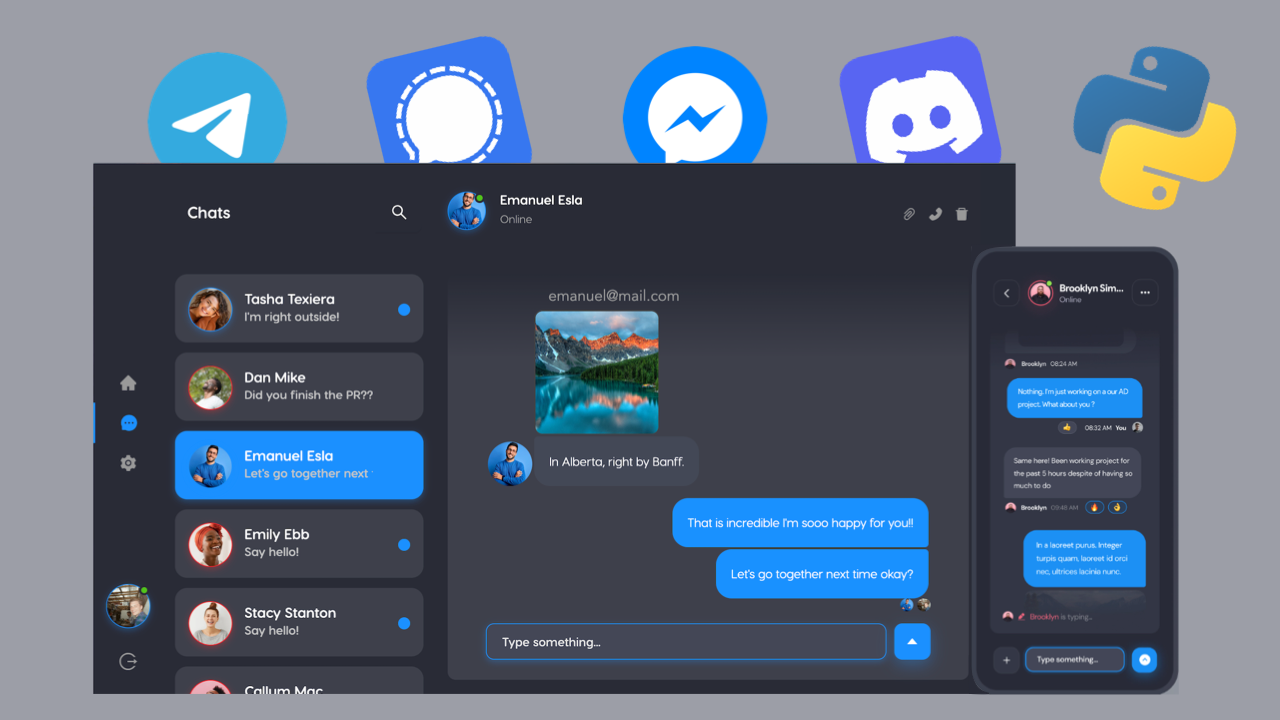
You can check out a demo below of what we’ll be building.
[IMAGE OR GIF HERE]
1. Setting up the ExpressJS server
First, let’s setup a project and a backend folder in that project for our ExpressJS server.
mkdir express-reactjs-chat
cd express-reactjs-chat
mkdir backend
cd backend
Within this backend folder, let’s configure an ExpressJS and install the necessary dependencies.
npm init
npm install express cors axios
npm install --save-dev nodemonexpressis the HTTP server framework we’ll be usingcorsallows us to process requests from other hosts (i.e. our ReactJS app)axiosallows us to send HTTP requests to other servers (for Chat Engine API calls)nodemonallows us to run the server in dev-mdoe
Make sure we all the following script in package.json.
{
    ...
    "scripts": {
        "start": "nodemon index.js"
    }
    ...
}
With out ExpressJS server setup and our dependencies installed, let’s start coding. Create a new file backend/index.js and add the following code:
const express = require("express");
const cors = require("cors");
const axios = require("axios");

const app = express();
app.use(express.json());
app.use(cors({ origin: true }));

app.post("/signup", async (req, res) => {
  return {};
});

app.post("/login", async (req, res) => {
  return {};
});

app.listen(3001);
We can run this server with the following line: npm run start
Part one is complete! We now have a basic Express server, running at http://localhost:3001, with two routes for /login and /signup.
Your folder structure should look like this:
.
└── backend
    ├── index.js
    ├── package.json
    ├── package-lock.json
    └── node_modules
The server currently does nothing, so let’s setup a ChatEngine.io project and let users access our chat platform.
2. Adding chat support to the ExpressJS server
This part is simple. Go to ChatEngine.io, create an account, and setup a “New Project”.
Your new “project” is a chat server, provided for free by Chat Engine! This chat server supports API calls and websocket connections - so your users can authenticate into it and host chatrooms there.
Copy the Project ID and Private Key. The Project ID identifies your project in API calls. The Private Key allows you to create and destroy users with your API calls.
Now we can add the following code to /signup within backend/index.js
app.post("/signup", async (req, res) => {
  const { username, secret, email, first_name, last_name } = req.body;

  // Store a user-copy on Chat Engine!
  try {
    const r = await axios.post(
      "https://api.chatengine.io/users/",
      { username, secret, email, first_name, last_name },
      { headers: { "Private-Key": "XXXXXXXX-XXXX-XXXX-XXXXXXXXXXXX" } }
    );
    return res.status(r.status).json(r.data);
  } catch (e) {
    return res.status(e.response.status).json(e.response.data);
  }
});
Be sure to replace "Private-Key" with your own value. This code will store the new user on Chat Engine and give them access to our chat platform.
Add the following code to /login within backend/index.js
app.post("/login", async (req, res) => {
  const { username, secret } = req.body;

  // Fetch this user from Chat Engine in this project!
  try {
    const r = await axios.get("https://api.chatengine.io/users/me/", {
      headers: {
        "Project-ID": "XXXXXXXX-XXXX-XXXX-XXXXXXXXXXXX",
        "User-Name": username,
        "User-Secret": secret,
      },
    });
    return res.status(r.status).json(r.data);
  } catch (e) {
    return res.status(e.response.status).json(e.response.data);
  }
});
Be sure to replace "Project-ID" with your own value. This code will authenticate an existing user on Chat Engine within our project!
Now we have a fully working chat server! When users singup or login, they now have access to the Chat Engine platform!
3. Setting up the ReactJS frontend
To setup the frontend, go back to the top level of your express-react-chat project. Run the following command:
npx create-react-app frontend
cd frontend
4. Connect our frontend to FastAPI and Chat Engine
We’ll need to setup a login/sign-up page and a chats page for authenticated users. To do so, let’s add the following code to frontend/src/app.js
import { useState } from "react";

import AuthPage from "./authPage";
import ChatsPage from "./chatsPage";

function App() {
  const [user, setUser] = useState();

  if (!user) {
    return <AuthPage onAuth={(user) => setUser(user)} />;
  } else {
    return <ChatsPage user={user} />;
  }
}

export default App;
This code will render an authPage or chatsPage depending on if an authenticated user is in our app state. Clearly, we have not created authPage or chatsPage.
Create a frontend/src/authPage.js file and add the following code:
import { useState } from "react";
import axios from "axios";

const AuthPage = (props) => {
  const [username, setUsername] = useState();
  const [secret, setSecret] = useState();
  const [email, setEmail] = useState();
  const [first_name, setFirstName] = useState();
  const [last_name, setLastName] = useState();

  const onLogin = (e) => {
    e.preventDefault();
    axios
      .post("http://localhost:3001/login", { username, secret })
      .then((r) => props.onAuth({ ...r.data, secret })) // NOTE: over-ride secret
      .catch((e) => console.log(JSON.stringify(e.response.data)));
  };

  const onSignup = (e) => {
    e.preventDefault();
    axios
      .post("http://localhost:3001/signup", {
        username,
        secret,
        email,
        first_name,
        last_name,
      })
      .then((r) => props.onAuth({ ...r.data, secret })) // NOTE: over-ride secret
      .catch((e) => console.log(JSON.stringify(e.response.data)));
  };

  return (
    <div className="login-page">
      <div className="card">
        {/* Login Form */}
        <form onSubmit={onLogin}>
          <div className="title">Login</div>
          <input
            type="text"
            name="username"
            placeholder="Username"
            onChange={(e) => setUsername(e.target.value)}
          />
          <input
            type="password"
            name="secret"
            placeholder="Password"
            onChange={(e) => setSecret(e.target.value)}
          />
          <button type="submit">LOG IN</button>
        </form>

        {/* Sign Up Form */}
        <form onSubmit={onSignup}>
          <div className="title">or Sign Up</div>
          <input
            type="text"
            name="username"
            placeholder="Username"
            onChange={(e) => setUsername(e.target.value)}
          />
          <input
            type="password"
            name="secret"
            placeholder="Password"
            onChange={(e) => setSecret(e.target.value)}
          />
          <input
            type="text"
            name="email"
            placeholder="Email"
            onChange={(e) => setEmail(e.target.value)}
          />
          <input
            type="text"
            name="first_name"
            placeholder="First name"
            onChange={(e) => setFirstName(e.target.value)}
          />
          <input
            type="text"
            name="last_name"
            placeholder="Last name"
            onChange={(e) => setLastName(e.target.value)}
          />
          <button type="submit">SIGN UP</button>
        </form>
      </div>

      <style>{`
      .login-page { width: 100vw; height: 100vh; padding-top: 6vw; background: linear-gradient(180deg, rgba(117,84,160,1) 7%, rgba(117,84,160,1) 17%, rgba(106,95,168,1) 29%, rgba(99,103,174,1) 44%, rgba(87,116,184,1) 66%, rgba(70,135,198,1) 83%, rgba(44,163,219,1) 96%, rgba(22,188,237,1) 100%, rgba(0,212,255,1) 100%); }
      .card { width: 200px; position: relative; left: calc(50vw - 100px); text-align: center; }
      .title { padding-top: 32px; font-size: 22px; color: white; font-weight: 700; }
      input { width: calc(100% - 16px); margin-top: 12px; padding: 8px; background-color: #e6f7ff; outline: none; border: 1px solid #e6f7ff; }
      button { margin-top: 12px; width: 100%; padding: 8px; }
      `}</style>
    </div>
  );
};

export default AuthPage;
This is a single ReactJS page with a Login and SignUp form. Once completed, they call http://localhost:3001/login and http://localhost:3001/signup respectively.
Assuming our server is running, these API calls will fetch and create new users, then return the proper JSON data. Once the API call is complete, our props.onAuth callback will update user state in src/app.js. This means we’re ready to work on out chats page.
Finally, to complete our chatsPage, we’ll need to connect our authenticated users to our Chat Engine server. We can do this with one of Chat Engine’s prebuilt UIs.
In this tutorial, we’ll use react-chat-engine-pretty.
Run the follwoing bash command and add the following code to frontend/src/chatsPage.js.
npm install react-chat-engine-prettyimport { PrettyChatWindow } from "react-chat-engine-pretty";
const ChatsPage = (props) => {
return (
<div style={{ height: "100vh" }}>
<PrettyChatWindow
projectId="..."
username={props.user.username} // adam
secret={props.user.secret} // pass1234
style={{ height: "100%" }}
/>
</div>
);
};
export default ChatsPage;Make sure you add your “Project ID” to the projectId prop.
What you’re doing here is connecting a user to your chat engine project with a prebuilt UI. react-chat-engine-pretty handles all state management and websocket connections! This way your chat app is fully functional with little-to-no coding!
Run the react app with npm run start
Done 🎉
You’re chat app is fully functional now! Please email adam@lamorre.co with any questions or post in Chat Engine’s stackoverflow.
Hope you enjoyed!